Confidential Computing
Info
Confidential Computing is in early preview on Verda Cloud and available via the cloud console and API to select customers. If you are interested, reach out to us.
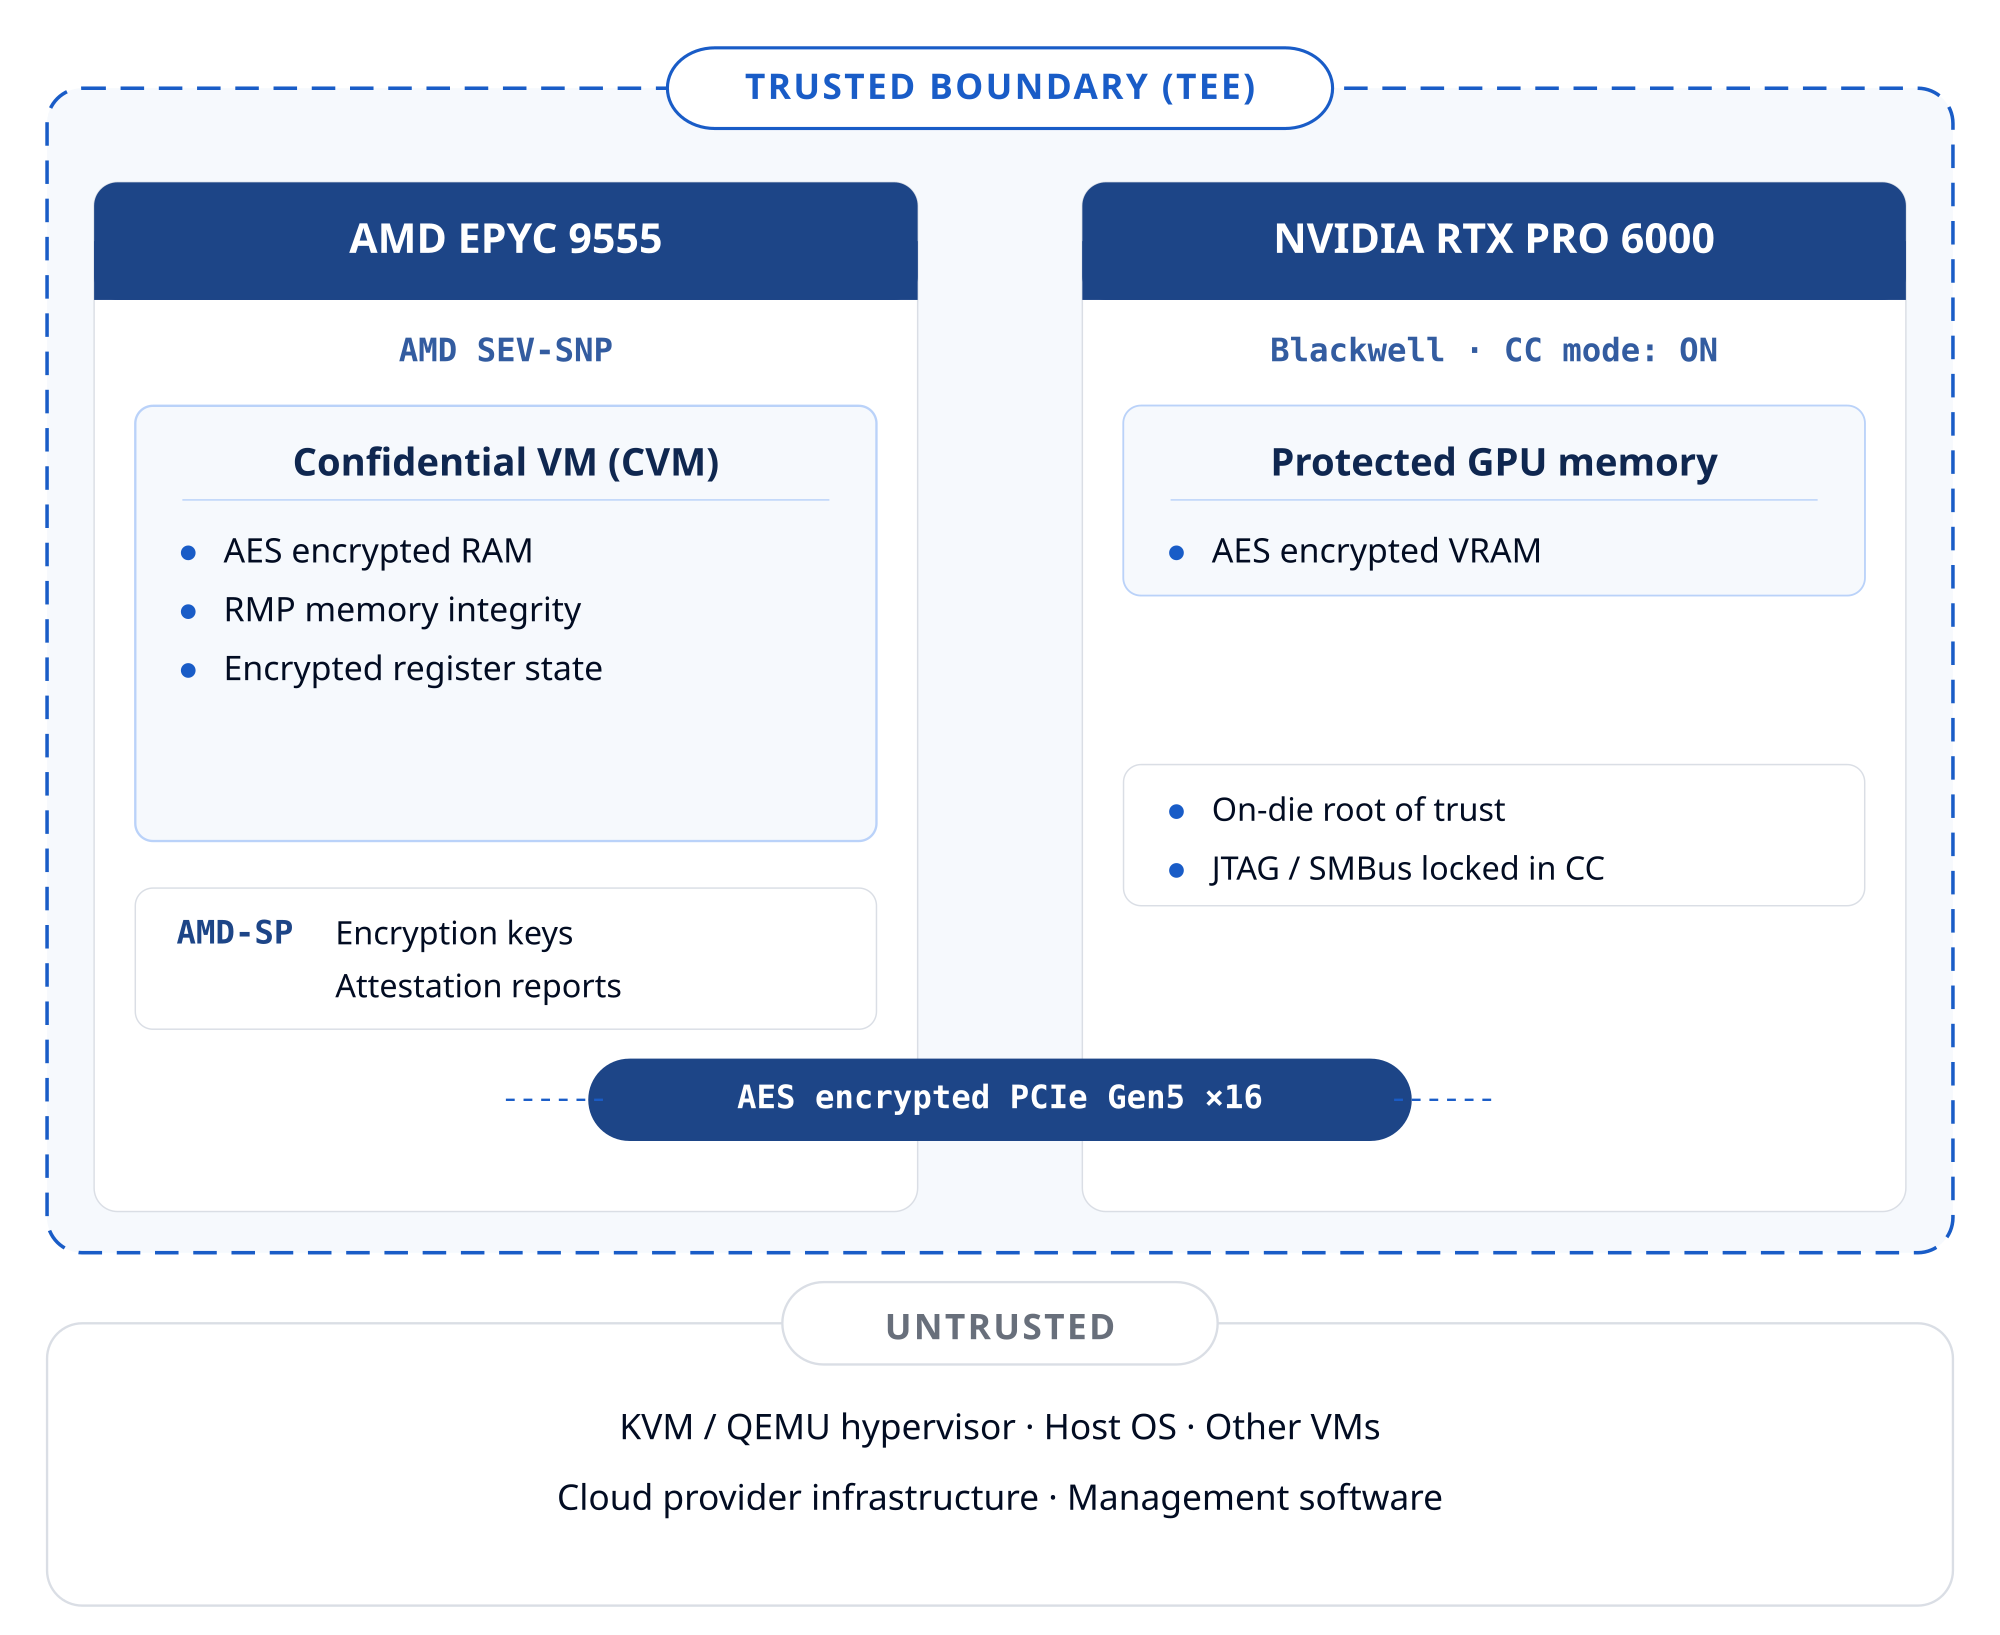
Confidential Computing (CC) protects data in use — while it is actively being processed in memory — not just at rest on disk or in transit over the network. Verda Confidential VMs (CVM) run inside a hardware-enforced Trusted Execution Environment (TEE) that encrypts both CPU and GPU memory and cryptographically isolates your workload from the hypervisor and the cloud provider. Even Verda's own infrastructure cannot read plaintext data inside a running CVM.
How it works
- AMD SEV-SNP (CPU): each CVM gets a unique AES-128 memory encryption key managed exclusively by the AMD Secure Processor (AMD-SP), an on-chip security co-processor the hypervisor cannot access. SEV-SNP adds memory integrity protection via the Reverse Map Table (RMP), which prevents the hypervisor from replaying, remapping, or corrupting guest memory pages. CPU register state is additionally encrypted on every hypervisor exit (SEV-ES).
- NVIDIA Confidential Computing (GPU): the RTX PRO 6000 Blackwell GPU runs in CC mode with all ingress and egress paths protected by AES-256-GCM encryption. GPU memory is isolated from the host. NVIDIA firmware verifies its own integrity at boot via an on-die hardware Root of Trust before the GPU accepts any workload.
- Encrypted PCIe transfers: data moving between the CVM and the GPU passes through bounce buffers. Payloads are AES-GCM-encrypted inside the CVM, staged through a shared PCIe buffer, and decrypted only once inside GPU-protected memory. A rolling 96-bit IV and an AES-GCM AuthTag prevent replay and tampering on the bus.
- Trust boundary: the TEE perimeter encloses the CVM and the GPU's protected memory. The KVM/QEMU hypervisor, host OS, cloud management software, and all other VMs sit outside this boundary and are treated as untrusted.
- Attestation: before any workload runs, you can cryptographically verify the full hardware stack. CPU and GPU attestation are independent: the AMD-SP issues a signed SEV-SNP report (VCEK-signed ECDSA, tied to the firmware TCB version) verifiable against AMD's certificate chain, while
nvattestperforms GPU-only remote attestation — proving the GPU is genuine, firmware is unmodified, and CC mode is active.
Architecture
The AMD-SP hardware and the CVM (including its assigned GPU) are the only trusted components. The hypervisor can schedule and terminate the VM but cannot read its memory or register state. Verda's management plane is outside the trust boundary and has no access to plaintext data or decryption keys.
Attestation chain
Before a workload runs, the full hardware stack can be verified by a remote party. CPU and GPU attestation are separate flows. See System Attestation for the exact commands to run on your instance.
- CPU attestation (AMD SEV-SNP): the AMD-SP generates a report containing a measurement of the VM's initial memory, the SEV-SNP TCB version, and a user-supplied nonce or public key hash. The report is signed with the VCEK — a per-chip ECDSA key cryptographically derived from the firmware version — verifiable against AMD's public certificate chain. This is handled independently via the SEV guest driver (
/dev/sev-guest). - GPU attestation (NVIDIA):
nvattest attest --device gpu --verifier remotedrives a GPU-only attestation flow. The NVIDIA driver establishes an SPDM session with GPU firmware using a Diffie-Hellman key exchange, and GPU firmware returns a certificate and measurement report signed by NVIDIA's Root of Trust, proving the GPU is genuine and running unmodified firmware in CC mode. On success,nvattestautomatically sets the GPU Ready State, which gates CUDA workload execution.
Supported Hardware
Verda currently supports confidential computing on the NVIDIA RTX PRO 6000 (Single GPU). Support for additional Blackwell GPUs is planned for the future:
| GPU Model | Configuration | Availability |
|---|---|---|
| NVIDIA RTX PRO 6000 | Single GPU | Available |
| NVIDIA B200 | Single GPU | Coming soon |
| NVIDIA B200 | Multi GPU | Coming soon |
Info
RTX PRO 6000 Multi GPU is not supported. B300 is not yet supported.
System Attestation
Attestation lets you verify that your instance is running with full confidential computing protections enabled.
Verify CPU RAM encryption
$ sudo dmesg | grep -i sev-snp
[    1.816039] Memory Encryption Features active: AMD SEV SEV-ES SEV-SNP
Run AMD SEV-SNP CPU attestation
Install snpguest (one-time):
$ curl -fsSL https://github.com/virtee/snpguest/releases/download/v0.10.0/snpguest \
    -o /usr/local/bin/snpguest && chmod +x /usr/local/bin/snpguest
Check that SEV, SEV-ES, and SNP are all active:
Generate an attestation report and fetch the AMD certificate chain:
$ mkdir -p /tmp/snp-attest
$ snpguest report /tmp/snp-attest/report.bin /tmp/snp-attest/nonce.bin --random
$ snpguest fetch ca pem /tmp/snp-attest/ turin
$ snpguest fetch vcek pem /tmp/snp-attest/ /tmp/snp-attest/report.bin
Verify the certificate chain — AMD ARK → ASK → VCEK:
$ snpguest verify certs /tmp/snp-attest/
The AMD ARK was self-signed!
The AMD ASK was signed by the AMD ARK!
The VCEK was signed by the AMD ASK!
Verify the attestation report is signed by this chip's VCEK:
$ snpguest verify attestation /tmp/snp-attest/ /tmp/snp-attest/report.bin
Reported TCB Boot Loader from certificate matches the attestation report.
Reported TCB TEE from certificate matches the attestation report.
Reported TCB SNP from certificate matches the attestation report.
Reported TCB Microcode from certificate matches the attestation report.
VEK signed the Attestation Report!
Verify GPU confidential compute mode
$ nvidia-smi conf-compute -q
==============NVSMI CONF-COMPUTE LOG==============

    CC State                   : ON
    Multi-GPU Mode             : None
    CPU CC Capabilities        : AMD SEV-SNP
    GPU CC Capabilities        : CC Capable
    CC GPUs Ready State        : Not Ready
Run NVIDIA GPU attestation
Install nvattest (one-time):
Run remote attestation against the GPU:
$ nvattest attest --device gpu --verifier remote
Devices:
- Device 0:
    Device Type: gpu
    Hardware Model: GB20X
    UEID: 632831960640621557346471716215948155372539415535
    VBIOS Version: 98.02.8D.00.01
    Driver Version: 580.126.09
    Measurement Result: success
    Attestation Report Cert Chain:
        Status: valid, OCSP: good
        Expires: 9999-12-31T23:59:59Z
    Driver RIM Cert Chain:
        Status: valid, OCSP: good
        Expires: 2028-01-07T22:11:08Z
    VBIOS RIM Cert Chain:
        Status: valid, OCSP: good
        Expires: 2027-08-26T10:19:38Z

GPU attestation was successful
Key fields to check in the output:
| Field | Expected |
|---|---|
| Measurement Result | success |
| Attestation Report Cert Chain | valid, OCSP: good |
| Driver RIM Cert Chain | valid, OCSP: good |
| VBIOS RIM Cert Chain | valid, OCSP: good |
| Final line | GPU attestation was successful |
Set the GPU ready state
The GPU will not accept any workload until a user inside the CVM sets the ReadyState. This prevents accidental usage before attestation is complete.
Successfully passing remote attestation (see above) automatically sets the ready state. You can also set it manually:
Warning
Do not set the ready state before verifying attestation. The restriction exists to ensure the GPU's integrity has been confirmed.
Protecting Your Confidential Data
When running a Confidential VM, you can create a user with an encrypted home folder so that your data at rest is also protected.
Create an encrypted user
Log in to your user with login (this will ask for your password and decrypt the home folder):
Verify home folder encryption
Create a test file from your user session:
Then exit and inspect the home folder as root. If encryption is working correctly, you will not see test.txt but instead encrypted directory entries:
$ exit
root@ncc-vm:~# ls -lah /home/newusername/
total 8.0K
dr-x------ 2 newusername newusername   4.0K Mar  2 14:25 .
drwxr-xr-x 4 root        root          4.0K Mar  2 14:44 ..
lrwxrwxrwx 1 newusername newusername   33 Mar  2 14:25 .Private -> /home/.ecryptfs/newusername/.Private
lrwxrwxrwx 1 newusername newusername   34 Mar  2 14:25 .ecryptfs -> /home/.ecryptfs/newusername/.ecryptfs
Booting a Custom OS
By default, Verda confidential computing instances are provisioned with Ubuntu 24.04. If you need a different OS (e.g., Ubuntu 25.10), you can deploy a custom image using kexec to boot from a secondary volume without modifying the original OS.
How it works
- Locally: build a ready-to-boot raw image from an Ubuntu 25.10 cloud image with your SSH key and network config baked in
- On the instance: write the image to the empty secondary volume (
vdb) andkexecinto its kernel, bypassing UEFI/GRUB on the primary volume
The original OS on vda is never modified and serves as a fallback.
Prerequisites
- A Verda instance with two volumes: the provisioned OS (
vda) and an empty volume (vdb) - SSH access to the instance as root
- A Linux machine with
libguestfs-toolsandqemu-utilsfor image building
1. Configure
2. Install dependencies (local machine)
install_deps.sh
3. Build the image (local machine)
01_build_image.sh
#!/bin/bash
# Downloads Ubuntu 22.04 cloud image, injects SSH key, network config,
# and first-boot partition resize. Outputs a raw image ready for dd.
#
# Requires: source .env (must set SSH_KEY)
# Requires: libguestfs-tools, qemu-utils (see install_deps.sh)
set -e

if [ -z "$SSH_KEY" ]; then
  echo "Error: SSH_KEY is not set. Run: source .env" >&2
  exit 1
fi

IMAGENAME=questing-server-cloudimg-amd64.img
RAWNAME=questing-server-raw.img

# Download cloud image
wget -O $IMAGENAME https://cloud-images.ubuntu.com/questing/current/$IMAGENAME

# Customize image
virt-customize -a $IMAGENAME \
  --root-password disabled \
  --ssh-inject root:string:"$SSH_KEY" \
  --run-command 'ssh-keygen -A' \
  --run-command 'sed -i "s/#\?PermitRootLogin.*/PermitRootLogin prohibit-password/" /etc/ssh/sshd_config' \
  --mkdir /etc/netplan \
  --write /etc/netplan/01-netcfg.yaml:'network:
  version: 2
  ethernets:
    eth0:
      dhcp4: true
      critical: true' \
  --run-command 'sed -i "s/^GRUB_CMDLINE_LINUX=.*/GRUB_CMDLINE_LINUX=\"net.ifnames=0 biosdevname=0 fsck.mode=auto fsck.repair=yes\"/" /etc/default/grub' \
  --run-command 'update-grub' \
  --run-command 'systemctl disable cloud-init cloud-init-local cloud-config cloud-final' \
  --firstboot-command 'ROOT_DEV=$(findmnt -n -o SOURCE /); DISK=$(lsblk -n -o PKNAME $ROOT_DEV); PARTNUM=$(echo $ROOT_DEV | grep -o "[0-9]*$"); growpart /dev/$DISK $PARTNUM && resize2fs $ROOT_DEV' \
  --truncate /etc/machine-id

# Convert to raw for dd
qemu-img convert -f qcow2 -O raw $IMAGENAME $RAWNAME

echo "Image ready: $RAWNAME ($(du -h $RAWNAME | cut -f1))"
This downloads the Ubuntu 25.10 cloud image, injects your SSH key, configures DHCP networking, disables cloud-init, and adds a first-boot partition resize service. Produces questing-server-raw.img (~2 GB).
4. Upload and write image (on the instance)
$ scp questing-server-raw.img 02_write_image.sh 03_kexec_boot.sh root@$INSTANCE_IP:/root/
$ ssh root@$INSTANCE_IP "apt-get install -y kexec-tools && bash /root/02_write_image.sh"
02_write_image.sh
5. Boot into the custom OS (on the instance)
03_kexec_boot.sh
#!/bin/bash
# Boots into the OS on /dev/vdb via kexec.
# Run this script on the Verda instance (not locally).
#
# Requires: kexec-tools (apt-get install -y kexec-tools)
set -e

# Find root partition on vdb (largest ext4)
partprobe /dev/vdb 2>/dev/null
sleep 1
ROOT_PART=$(lsblk -ln -o NAME,FSTYPE,SIZE /dev/vdb | awk '$2=="ext4"' | sort -h -k3 | tail -1 | awk '{print $1}')
ROOT_DEV=/dev/$ROOT_PART

# Mount root
mkdir -p /mnt/newroot
mount $ROOT_DEV /mnt/newroot
ROOT_UUID=$(blkid -s UUID -o value $ROOT_DEV)

# Check for kernel in root, otherwise mount separate boot partition
BOOT_DIR=/mnt/newroot/boot
if ! ls $BOOT_DIR/vmlinuz-* >/dev/null 2>&1; then
  BOOT_PART=$(lsblk -ln -o NAME,FSTYPE,SIZE /dev/vdb | awk '$2=="ext4"' | sort -h -k3 | head -1 | awk '{print $1}')
  if [ "$BOOT_PART" != "$ROOT_PART" ]; then
    BOOT_DIR=/mnt/newboot
    mkdir -p $BOOT_DIR
    mount /dev/$BOOT_PART $BOOT_DIR
  fi
fi

KERNEL=$(ls $BOOT_DIR/vmlinuz-* | sort -V | tail -1)
INITRD=$(ls $BOOT_DIR/initrd.img-* | sort -V | tail -1)

echo "Kernel:  $KERNEL"
echo "Initrd:  $INITRD"
echo "Root:    UUID=$ROOT_UUID"

# Load kernel
kexec -l "$KERNEL" --initrd="$INITRD" \
  --command-line="root=UUID=$ROOT_UUID ro net.ifnames=0 biosdevname=0 fsck.mode=auto fsck.repair=yes"

umount $BOOT_DIR 2>/dev/null || true
umount /mnt/newroot 2>/dev/null || true

# Unload NVIDIA kernel modules before kexec so the new kernel gets clean GPUs.
# Without this, the GPU's GSP firmware remains initialized from the
# current boot and the new kernel fails with "unexpected WPR2 already up".
systemctl stop nvidia-persistenced 2>/dev/null || true
killall -9 nvidia-persistenced 2>/dev/null || true
for MOD in nvidia_uvm nvidia_drm nvidia_modeset nvidia; do
  rmmod $MOD 2>/dev/null && echo "Unloaded $MOD" || true
done

kexec -e
The SSH connection will drop when kexec reboots the kernel. Wait ~15 seconds, then reconnect:
You should now be running Ubuntu 25.10 from vdb.
6. Make it permanent (optional)
By default, a hard-reboot from the Verda console boots back into the primary OS on vda. To make it automatically kexec into the custom OS on every reboot:
04_make_permanent.sh
#!/bin/bash
# Installs a systemd service on the primary OS (vda) that automatically
# kexec-boots into the secondary OS (vdb) on every boot.
# Run this script on the Verda instance while booted into the primary OS (vda).
#
# Requires: kexec-tools (apt-get install -y kexec-tools)
set -e

# Create the kexec boot script
cat > /usr/local/bin/kexec-vdb.sh << 'SCRIPT'
#!/bin/bash
set -e

ROOT_PART=$(lsblk -ln -o NAME,FSTYPE,SIZE /dev/vdb | awk '$2=="ext4"' | sort -h -k3 | tail -1 | awk '{print $1}')
ROOT_DEV=/dev/$ROOT_PART

mkdir -p /mnt/newroot
mount $ROOT_DEV /mnt/newroot
ROOT_UUID=$(blkid -s UUID -o value $ROOT_DEV)

BOOT_DIR=/mnt/newroot/boot
if ! ls $BOOT_DIR/vmlinuz-* >/dev/null 2>&1; then
  BOOT_PART=$(lsblk -ln -o NAME,FSTYPE,SIZE /dev/vdb | awk '$2=="ext4"' | sort -h -k3 | head -1 | awk '{print $1}')
  if [ "$BOOT_PART" != "$ROOT_PART" ]; then
    BOOT_DIR=/mnt/newboot
    mkdir -p $BOOT_DIR
    mount /dev/$BOOT_PART $BOOT_DIR
  fi
fi

KERNEL=$(ls $BOOT_DIR/vmlinuz-* | sort -V | tail -1)
INITRD=$(ls $BOOT_DIR/initrd.img-* | sort -V | tail -1)

kexec -l "$KERNEL" --initrd="$INITRD" \
  --command-line="root=UUID=$ROOT_UUID ro net.ifnames=0 biosdevname=0 fsck.mode=auto fsck.repair=yes"

umount $BOOT_DIR 2>/dev/null || true
umount /mnt/newroot 2>/dev/null || true

# Unload NVIDIA modules so the new kernel gets clean GPUs
systemctl stop nvidia-persistenced 2>/dev/null || true
killall -9 nvidia-persistenced 2>/dev/null || true
for MOD in nvidia_uvm nvidia_drm nvidia_modeset nvidia; do
  rmmod $MOD 2>/dev/null || true
done

kexec -e
SCRIPT
chmod +x /usr/local/bin/kexec-vdb.sh

# Create systemd service
cat > /etc/systemd/system/kexec-vdb.service << 'SERVICE'
[Unit]
Description=Kexec boot into secondary OS on vdb
After=network-online.target
Wants=network-online.target

[Service]
Type=oneshot
ExecStart=/usr/local/bin/kexec-vdb.sh

[Install]
WantedBy=multi-user.target
SERVICE

systemctl daemon-reload
systemctl enable kexec-vdb.service

echo "Permanent kexec boot enabled. The instance will automatically boot into vdb on every reboot."
Hard-reboot the instance from the Verda console to get back into the primary OS, then:
From now on, every time the instance boots into vda, it will automatically kexec into vdb within seconds.
Recovery
If the kexec boot fails, the original Ubuntu 24.04 on vda is untouched. Use the Verda console to hard-reboot back into the provisioned OS, then re-run 03_kexec_boot.sh.
If step 6 was applied and you want to disable auto-kexec, run from the primary OS: